
On Disk Encryption with Red Hat Enterprise Linux
Author: Bowe Strickland, Curriculum Manager Contact: bowe@redhat.com Copyright: Copyright © 2011, Red Hat, Inc. All rights reserved.
Contents
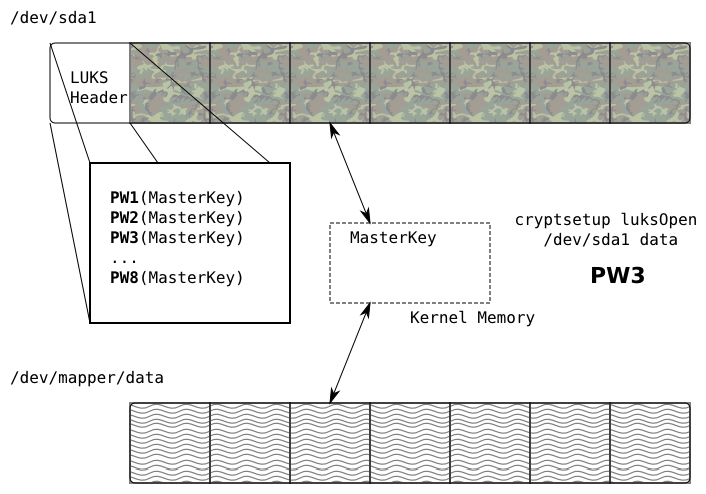
Block Device Encryption with dm-crypt and LUKS
Block Device Encryption dm-crypt / LUKS
- Introduced in RHEL 5
- Requires cryptsetup-luks
- dm-crypt provides the capability
- LUKS defines the key management and on disk format
Demonstration
Initialize device with random data: cat /dev/urandom
[root@station ~]# cat /dev/urandom > /dev/sda5
cat: write error: No space left on device
Format LUKS encryption layer: cryptsetup luksFormat
[root@station ~]# cryptsetup luksFormat /dev/sda5

WARNING!
========
This will overwrite data on /dev/sda5 irrevocably.

Are you sure? (Type uppercase yes): YES
Enter LUKS passphrase: shazbot
Verify passphrase: shazbot
Open LUKS encryption layer: cryptsetup
[root@station ~]# cryptsetup luksOpen /dev/sda5 home_plaintext
Enter passphrase for /dev/sda5: shazbot

# for the curious

[root@station ~]# ls -l /dev/mapper/
total 0
crw-rw----. 1 root root 10, 58 May  4 12:12 control
lrwxrwxrwx. 1 root root      7 May  4 12:40 home_plaintext -> ../dm-0

# for the more curious

[root@station ~]# dmsetup table
home_plaintext: 0 1044480 crypt aes-cbc-essiv:sha256 000...000 0 252:5 4096
Format the filesystem: mkfs
[root@station ~]# mkfs.ext4 /dev/mapper/home_plaintext
mke2fs 1.41.12 (17-May-2010)
...
This filesystem will be automatically checked every 36 mounts or
180 days, whichever comes first.  Use tune2fs -c or -i to override.
Mount the filesystem: mount
[root@station ~]# grep home /etc/fstab
/dev/mapper/home_paintext /home            ext4    defaults        0 0

[root@station ~]# mount -a
[root@station ~]# df -h
Filesystem            Size  Used Avail Use% Mounted on
/dev/sda2             4.0G  1.4G  2.4G  37% /
tmpfs                 246M     0  246M   0% /dev/shm
/dev/sda1             248M   30M  206M  13% /boot
/dev/mapper/home_plaintext
                      494M   11M  459M   3% /home
Register the encrypted drive: /etc/crypttab
[root@station ~]# man crypttab

[root@station ~]# grep home /etc/crypttab
home_plaintext        /dev/vda5
Reboot and confirm
ecrypt-fs
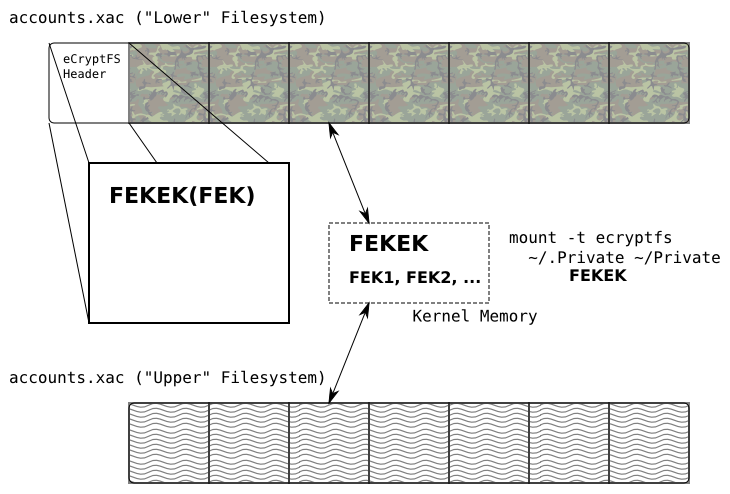
eCryptfs Filesystem
- Introduced in RHEL-6
- Requires ecryptfs-utils
- FEK: File Encryption Key (on per file)
- FEKEK: File Encryption Key Encryption Key (on per mount)
Demonstration
Ensure the software is installed: yum
[root@station ~]# yum install -y ecryptfs-utils gettext
Loaded plugins: refresh-packagekit, rhnplugin

...

Installed:
  ecryptfs-utils.x86_64 0:82-6.el6       gettext.x86_64 0:0.17-16.el6

Dependency Installed:
  cvs.x86_64 0:1.11.23-11.el6            keyutils.x86_64 0:1.4-1.el6
  libgomp.x86_64 0:4.4.4-13.el6          trousers.x86_64 0:0.3.4-4.el6

Complete!
Create a lower and upper directory: ~/.Private, ~/Private
[root@station ~]$ mkdir -m 700 ~/.Private
[root@station ~]$ mkdir -m 500 ~/Private
Mount the upper directory for the first time: mount -t ecryptfs
[root@station ~]$ mount -t ecryptfs .Private Private
Select key type to use for newly created files:
 1) openssl
 2) passphrase
 3) tspi
Selection: 2
Passphrase:

Select cipher:
 1) aes: blocksize = 16; min keysize = 16; max keysize = 32 (not loaded)
 2) blowfish: blocksize = 16; min keysize = 16; max keysize = 56 (not loaded)
 3) des3_ede: blocksize = 8; min keysize = 24; max keysize = 24 (not loaded)
 4) cast6: blocksize = 16; min keysize = 16; max keysize = 32 (not loaded)
 5) cast5: blocksize = 8; min keysize = 5; max keysize = 16 (not loaded)
Selection [aes]:

Select key bytes:
 1) 16
 2) 32
 3) 24
Selection [16]:

Enable plaintext passthrough (y/n) [n]:
Enable filename encryption (y/n) [n]:
Attempting to mount with the following options:
  ecryptfs_unlink_sigs
  ecryptfs_key_bytes=16
  ecryptfs_cipher=aes
  ecryptfs_sig=be9b09a528a8651c

WARNING: Based on the contents of [/root/.ecryptfs/sig-cache.txt],
it looks like you have never mounted with this key
before. This could mean that you have typed your
passphrase wrong.

Would you like to proceed with the mount (yes/no)? : yes
Would you like to append sig [be9b09a528a8651c] to
[/root/.ecryptfs/sig-cache.txt]
in order to avoid this warning in the future (yes/no)? : yes
Successfully appended new sig to user sig cache file
Mounted eCryptfs
Try it out:
[root@station ~]$ cal 1752 > ~/Private/weird_year.txt
[root@station ~]$ cat ~/Private/weird_year.txt
                               1752

       January               February                 March
Su Mo Tu We Th Fr Sa   Su Mo Tu We Th Fr Sa   Su Mo Tu We Th Fr Sa
          1  2  3  4                      1    1  2  3  4  5  6  7
 5  6  7  8  9 10 11    2  3  4  5  6  7  8    8  9 10 11 12 13 14
 ...
                       31
        July                  August                September
Su Mo Tu We Th Fr Sa   Su Mo Tu We Th Fr Sa   Su Mo Tu We Th Fr Sa
          1  2  3  4                      1          1  2 14 15 16
 5  6  7  8  9 10 11    2  3  4  5  6  7  8   17 18 19 20 21 22 23
12 13 14 15 16 17 18    9 10 11 12 13 14 15   24 25 26 27 28 29 30
19 20 21 22 23 24 25   16 17 18 19 20 21 22
26 27 28 29 30 31      23 24 25 26 27 28 29
                       30 31
....

[root@station ~]$ cat ~/.Private/weird_year.txt
(... binary ciphertext ...)
Unmount the upper filesystem
[root@station ~]# umount ~/Private
Access the filesystem again:
[root@station ~]# mount -t ecryptfs .Private Private
Select key type to use for newly created files:
 1) tspi
 2) passphrase
 3) openssl
Selection: 2
Passphrase:
Select cipher:
 1) aes: blocksize = 16; min keysize = 16; max keysize = 32 (not loaded)
 2) blowfish: blocksize = 16; min keysize = 16; max keysize = 56 (not loaded)
 3) des3_ede: blocksize = 8; min keysize = 24; max keysize = 24 (not loaded)
 4) cast6: blocksize = 16; min keysize = 16; max keysize = 32 (not loaded)
 5) cast5: blocksize = 8; min keysize = 5; max keysize = 16 (not loaded)
Selection [aes]:
Select key bytes:
 1) 16
 2) 32
 3) 24
Selection [16]:
Enable plaintext passthrough (y/n) [n]:
Enable filename encryption (y/n) [n]:
Attempting to mount with the following options:
  ecryptfs_unlink_sigs
  ecryptfs_key_bytes=16
  ecryptfs_cipher=aes
  ecryptfs_sig=0b1460fdbe4ce020
Mounted eCryptfs
Procedure
Ensure the user is a member of the group ecryptfs
[root@station ~]# usermod -G ecryptfs prince
[root@station ~]# id prince
uid=501(prince) gid=501(prince) groups=501(prince),489(ecryptfs)
Setup the private directory: ecryptfs-setup-private
[prince@station ~]$ ecryptfs-setup-private
Enter your login passphrase:
Enter your mount passphrase [leave blank to generate one]:

************************************************************************
YOU SHOULD RECORD YOUR MOUNT PASSPHRASE AND STORE IT IN A SAFE LOCATION.
  ecryptfs-unwrap-passphrase ~/.ecryptfs/wrapped-passphrase
THIS WILL BE REQUIRED IF YOU NEED TO RECOVER YOUR DATA AT A LATER TIME.
************************************************************************


Done configuring.

Testing mount/write/umount/read...
Testing succeeded.

Logout, and log back in to begin using your encrypted directory.
Examine the unmounted directory:
[prince@station ~]$ ls Private/
Access-Your-Private-Data.desktop  README.txt

[prince@station ~]$ cat Private/README.txt
THIS DIRECTORY HAS BEEN UNMOUNTED TO PROTECT YOUR DATA.

From the graphical desktop, click on:
 "Access Your Private Data"

or

From the command line, run:
 ecryptfs-mount-private
Mount the private directory: ecryptfs-mount-private
[prince@station ~]$ ecryptfs-mount-private
Enter your login passphrase:
Inserted auth tok with sig [cfa25b7ea56bf148] into the user session keyring
Use the upper directory:
[prince@station ~]$ ls Private/
[prince@station ~]$ cal > Private/calendar.txt
[prince@station ~]$ head -3 Private/calendar.txt
      May 2011
Su Mo Tu We Th Fr Sa
 1  2  3  4  5  6  7
Examine the lower directory:
[prince@station ~]$ ls ~/.Private/
ECRYPTFS_FNEK_ENCRYPTED.FWal9veJf-KsekRSh8hEpQYK4fIgutwbjEoEBPttMaVSU5yrvxCv
vZs0uU--

[prince@station ~]$ head -3 ~/.Private/ECRYPTFS_FNEK_ENCRYPTED.FWal9veJf-Kse
kRSh8hEpQYK4fIgutwbjEoEBPttMaVSU5yrvxCvvZs0uU--
(... encrypted ciphertext ...)
When finished, unmount the private directory: ecryptfs-umount-private
[prince@station ~]$ ecryptfs-umount-private
[prince@station ~]$ ls Private/
Access-Your-Private-Data.desktop  README.txt
Labs
Encrypting the /home partition
Login into your station as root.
Preserve the contents of you /home partition by archiving to the /tmp directory:
[root@station ~]# rsync -av /home /tmp
Unmount the existing /home partition:
[root@station ~]# umount /home
In practice, you should initialize the device with random data. For the purposes of this lab, this time consuming step can be skipped:
# you may omit this step
[root@station ~]# cat /dev/urandom > /dev/vol0/home
Initialize the LUKS formatting on the block device. When prompted, provide a password of your choosing, but do not forget the password:
[root@station ~]# cryptsetup luksFormat /dev/vol0/home
Open the initialized device, using home_plaintext as the name of the manufactured plaintext interface:
[root@station ~]# cryptsetup luksOpen /dev/vol0/home home_plaintext
Create an ext4 filesystem:
[root@station ~]# mkfs.ext4 /dev/mapper/home_plaintext
Create a /etc/fstab entry which mounts the /dev/mapper/home_plaintext interface to the /home mountpoint:
[root@station ~]# grep home /etc/fstab
/dev/mapper/home_paintext /home            ext4    defaults        0 0
Mount the partition, using the /etc/fstab entry to ensure correctness:
[root@station ~]# mount -a
Restore the original data to the /home partition:
[root@station ~]# rsync -av /tmp/home/ /home
In order to automatically open the encrypted device on bootup, add the following entry to the /etc/crypttab file:
[root@station ~]# grep home /etc/crypttab
home_plaintext        /dev/vol0/home
Reboot your station to confirm a clean reboot.
Creating an encrypted ~/Private directory.
Login into your station as the user student.
Open a terminal, and su to the root account:
[student@station ~]$ su -
[root@station ~]#
Install the ecryptfs-utils and gettext packages:
[root@station ~]# yum install -y ecryptfs-utils gettext
Add the user student to the ecryptfs group, and exit:
[root@station ~]# usermod -G ecryptfs student
[root@station ~]# id student
[root@station ~]# exit
[student@station ~]$
As the user student, run the command ecryptfs-setup-private. Authenticate with your login password, and accept defaults for all remaining questions:
[student@station ~]$ ecryptfs-setup-private
- The newly created ~/Private directory can be mounted with
ecryptfs-mount-private and unmounted with ecryptfs-umount-private. Copy file into the mounted directory, and observe their ciphertext equivalents in ~/.Private.
Preserve the contents of the /home partition by archiving to the /tmp directory:
[root@station ~]# rsync -av /home /tmp
Unmount the existing /home partition:
[root@station ~]# umount /home
In practice, you should initialize the device with random data. For the purposes of this lab, this time consuming step can be skipped:
# you may omit this step
[root@station ~]# cat /dev/urandom > /dev/vol0/home
Initialize the LUKS formatting on the block device. When prompted, provide a password of your choosing, but do not forget the password:
[root@station ~]# cryptsetup luksFormat /dev/vol0/home
Open the initialized device, using home_plaintext as the name of the manufactured plaintext interface:
[root@station ~]# cryptsetup luksOpen /dev/vol0/home home_plaintext
Create an ext4 filesystem:
[root@station ~]# mkfs.ext4 /dev/mapper/home_plaintext
Create a /etc/fstab entry which mounts the /dev/mapper/home_plaintext interface to the /home mountpoint:
[root@station ~]# grep home /etc/fstab
/dev/mapper/home_paintext /home            ext4    defaults        0 0
Mount the partition, using the /etc/fstab entry to ensure correctness:
[root@station ~]# mount -a
Restore the original data to the /home partition:
[root@station ~]# rsync -av /tmp/home/ /home
In order to automatically open the encrypted device on bootup, add the following entry to the /etc/crypttab file:
[root@station ~]# grep home /etc/crypttab
home_plaintext        /dev/vol0/home
Reboot your station to confirm a clean reboot.