Demystifying systemd - Hands On
Introduction
Welcome! This lab consists of several mini-labs that focus on particular areas or components of systemd. Overall, systemd is relatively simple to learn and, thanks to the excellent documentation the project has, even advanced functionality is simple to reference when needed.
Outline
- Basic Concepts & Components
- Unit Files
- Resource Management
- The Journal
NOTE: There are several options to configure this lab
- Local VM running your favorite distro.
Note: The systemd specific parts of this lab will work on any distribution that ships a recent version of systemd. The parts of this lab that are *not* systemd specific were written using Fedora 24. You are welcome to use any distro, but if you do use an alternative option, you’re responsible for translating things like rpm/dnf, package names, etc.
- Fedora cloud images are available here: https://getfedora.org/en/cloud/download/
- Simple script to create a VM w/ libvirt
- Use Vagrant to accomplish the same thing
- Fedora libvirt/KVM Image: https://download.fedoraproject.org/pub/fedora/linux/releases/24/CloudImages/x86_64/images/Fedora-Cloud-Base-Vagrant-24-1.2.x86_64.vagrant-libvirt.box
- Fedora Virtualbox Image: https://download.fedoraproject.org/pub/fedora/linux/releases/24/CloudImages/x86_64/images/Fedora-Cloud-Base-Vagrant-24-1.2.x86_64.vagrant-virtualbox.box
- Use a systemd-nspawn container (note that a few sections of this lab won’t be possible w/ this option)
- Debian
- debootstrap --arch=amd64 stable ~/DebianJessie
- systemd-nspawn -bD ~/DebianJessie
- Fedora
- sudo dnf --releasever=24 --installroot=/var/lib/machine/f24 install systemd
- passwd dnf fedora-release
- systemd-nspawn -bD /var/lib/machine/f24 passwd
- systemd-nspawn -bD /var/lib/machine/f24
Initial Setup:
Once you’ve chosen your environment make sure your system has the following:
- Add your non-root account to /etc/sudoers
- Verify that you are running a version systemd >= v208.
ps -p1; systemctl --version
Lab 1: Basic Concepts & Components
Systemctl is the primary tool for interacting with systemd. Although the `service` and `chkconfig` commands still function it is highly recommended to switch to systemctl to take advantage of the full capabilities.
Scenario: Discover how this system is setup and configure a basic LAMP server.
- First, let’s make sure bash-completion is installed. This will give us a much nicer environment for working with systemctl. `rpm -qa |grep bash` if not present install via: `sudo dnf -y install bash-completion` If it was not installed you’ll need to logout and back into your terminal.
- With the shell configured, let’s take a look at the system boot stats.
- Run `systemd-analyze` and `systemd-analyze blame`
- Let’s identify the default target, which is similar to the concept of a runlevel.
- Run `systemctl get-default`
- Note: Targets can be changed during runtime using: `systemctl isolate [target]`
- multi-user.target == runlevel 3
- graphical.target == runlevel 5
- Let’s look at what’s installed and running on the system.
- Open a terminal and run `systemctl status`. This shows a nice summary of the system.
- Just running `systemctl` w/ no verbs or arguments will show the state of every unit on the system. This can be a bit much to look at on some systems.
- Let’s filter it by services: `systemctl -t service`. This is similar to `chkconfig --list` except it will only show the loaded units, or basically which services are currently running.
- Run `systemctl list-unit-files -t service` for a more complete list of installed unit files. This will include unit files that are not currently loaded. Compare the output of this command with the previous one.
- Now that we have a good idea of what’s installed on our systems, let’s get a basic lamp stack running.
- Run `sudo dnf -y install httpd mariadb-server mariadb php php-mysql mariadb-bench`
- Next, let’s set these to start on boot.
- **TIP** Systemctl allows us to “glob” units. Let’s enable Apache and MariaDB in a single command:
- Run `sudo systemctl enable httpd mariadb`
- Now start the services: `sudo systemctl start httpd mariadb` and view their status: `systemctl status httpd mariadb`.
- **TIP** Depending on the size of your terminal you might want to run the status command separately for each service.

**Notice we can see the service is “enabled” to start on boot, current status, the main and worker PIDs, cgroup hierarchy, and the last 10 log messages.
**It’s also worth noting that passing -H [hostname] will execute these commands on remote systems via SSH, e.g. `systemctl -H dns1.mydomain.org status named`
- Run `systemctl -t service. Now we can see both httpd & mariadb in the list now.
- Let’s check the dependencies of httpd: `systemctl list-dependencies httpd`
- Now compare that w/ `systemctl list-dependencies mariadb`
- diff <(systemctl list-dependencies httpd) <(systemctl list-dependencies mariadb)
- Why is this interesting?
- Let’s examine the [Unit] & [Install] sections of these units `systemctl cat httpd mariadb`
- Which unit will be started first?
- Now let’s learn the easy way to enable/disable services. Let’s set these units back to their original state. `sudo systemctl preset httpd mariadb`
- Now take a look at `systemctl status httpd mariadb`, under “Loaded” compare the status vs the vendor preset.
- Another nice trick systemctl gives us is the ability to start/stop & enable/disable in a single command. First stop the running services: `sudo systemctl stop httpd mariadb` and now verify they are not running: `systemctl status httpd mariadb`.
- Run `sudo systemctl enable --now httpd mariadb`
- Check out the status w/ `systemctl status httpd mariadb`
- This can be reversed with `systemctl disable --now httpd mariadb`. Go ahead and run this so the services are prepped for the next lab.
Lab 2: Unit Files
systemd unit files are declarative config files that follow a syntax similar to Windows ini files. They’re simple to create and are incredibly powerful.
Creating Unit files
Scenario: We want to create a few unit files. We’ll first create a simple example unit file followed by a few more that we’ll use in later labs for load testing.
- Create a unit file under /etc/systemd/system called helloworld.service
[Unit]
Description=The most impressive unit file of all time.
[Service]
ExecStart=/usr/bin/echo "hello world"
- Notify systemd of the unit via `systemctl daemon-reload`.
Note: this is safe to run on production systems. There are fringe cases when many thousands of unit files are being used where this can cause a periodic performance hit, but for the vast majority of systems this can be safely run at anytime.
- Start the unit with `systemctl start helloworld`. Pretty neat, eh? What did or did not happen?
- Next, let’s check the logs to see the output: `journalctl -u helloworld`. We’ll come back to journalctl in a later lab.
- Take a look at the unit defaults via `systemctl show helloworld`
Add socket activation for helloworld.service
In this section, we’ll do something slightly more interesting w/ our unit file.
- Create /etc/systemd/system/helloworld.socket
[Unit]
Description=activate hello world
[Socket]
ListenStream=8080
[Install]
WantedBy=sockets.target
- Notice that the unit name, helloworld, matches w/ both of these units. This unit will tell our system to listen on port 8080 and will activate the helloworld.service w/ a connection.
- Notify systemd of the changes via `systemctl daemon-reload`
- Run `systemctl start helloworld.socket` (note if this fails disable SELinux via `setenforce 0`)
- In a separate terminal tail the journal via `journalctl -f -u helloworld` (do you think you can remember those journalctl options?)
- In the original terminal run `curl http://localhost:8080` and watch the output from the second terminal. Why did it stop? Hint run the answer can be found in `systemctl show helloworld`. Don’t cheat yourself!! Find the answer before continuing!!
Now that you have a renewed sense of self-worth from finding the answer w/ out looking ahead, please continue.
- Now pretend you didn’t cheat and raise the StartLimitBurst to something bigger than the default. Experiment with 50 or 500. Note, you will cause a large load on your system if you try w/ 5 million or something so resist the urge for now.
- Edit /etc/systemd/system/helloworld.service and under [Service] add StartLimitBurst=50.
- Notify systemd of the changes. Remember that command?
- Run the curl command again. What happened? Why?
- Hint: run `systemctl status helloworld.socket`
- Restart helloworld.socket and run the curl statement again. Check the logs in the other terminal. How many times was helloworld.service started? Pretty slick.
Create the benchmark units
Unit files also have a powerful syntax for handling start order and dependencies. We’ll leverage some of this for our benchmarks.
- Create ab-bench.service
[Unit]
Description=Benching httpd test.
After=httpd.service
Wants=httpd.service
[Service]
Type=forking
ExecStart=/usr/bin/sh -c "/usr/bin/ab -c 100 -n 999999 http://localhost/index.html &"
- Create mariadb-bench.service
[Unit]
Description=Benching mariadb test.
After=mariadb.service
Wants=mariadb.service
[Service]
Type=forking
ExecStart=/usr/bin/sh -c 'cd /usr/share/sql-bench; ./run-all-tests --server=mysql --cmp=mysql,pg,solid --user=root &'
- Let’s look at the dependencies of these units for a minute.
- “Wants” tells systemd that IF httpd & mariadb are installed to start them when these units are run.
- “After” means to start these units after httpd & mariadb are running. Let’s test this.
- The first time mariadb starts it takes a few seconds to start while it initializes. Let’s get that out of the way via `systemctl start mariadb; sleep 20 ; systemctl stop mariadb`
- After notifying systemd of our new unit files, run `systemctl start mariadb-bench` and check the status of mariadb & mariadb-bench
- Do the same for httpd & ab-bench. What was the result? What was different? Why did this happen? If it fails to start the first time, run `systemctl start ab-bench` a second time and see if it runs.
- Create userjob1.service (adjust the User to match a non-root user on your system)
[Unit]
Description=Lame example user workload.
[Service]
Type=forking
User=cloud-user
Slice=user.slice
ExecStart=/usr/bin/sh -c "/usr/bin/cat /dev/zero > /dev/null &"
Systemd tracks a wide range of options that can be customized per unit. Using drop-in configuration files it’s simple to customize and tune services.
Customizing Unit files
Scenario: We want to configure our VM so it is resilient and monitors the status of key services.
- It’s important to understand a few basics about file locations:
- maintainer unit files are located in /usr/lib/systemd/system
- DO NOT MODIFY THESE AS RPMS WILL OVERWRITE CHANGES
- user unit files are located in /etc/systemd/system
- Unit files here will take precedence over /usr/lib/systemd/system.
- This is where you want to copy your own unit files and make customizations.
- Let’s look at a unit file to get an idea of what a they look like:
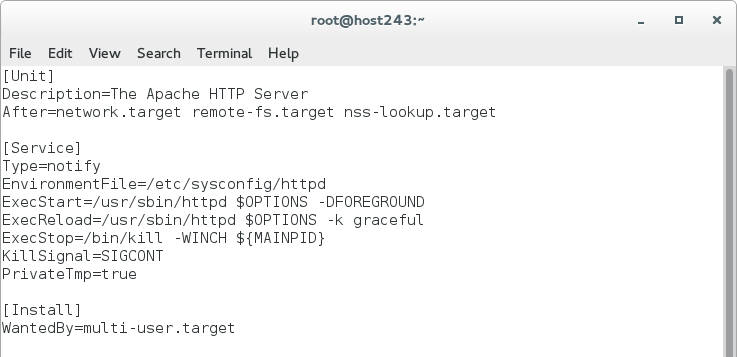
- The above unit file for httpd instructs systemd when to start it in the boot processes, the type of service, commands to start, stop, and reload, as well as the target to install the unit in. This is the type of information needed to write your own unit files, but systemd provides many more options.
- Run `systemctl show httpd` and explore the output to see what’s available.
- While the defaults for unit files are sensible and won’t need to be altered most of the time, there will be circumstances where tweaking these is quite beneficial. These could include hardware or software watchdog monitoring, tunings, resource management, or many other reasons.
- We’ll modify the httpd unit with a drop-in configuration file.
- First create the folder for the configs: `mkdir /etc/systemd/system/httpd.service.d`
- Open /etc/systemd/system/httpd.service.d/50-httpd.conf in your favorite editor. Which is obviously vi, rather than emacs. ;)
- vi /etc/systemd/system/httpd.service.d/50-httpd.conf
- Add the following options:
[Service]
Restart=always
OOMScoreAdjust=-1000
StartLimitAction=reboot
Nice=-10
- After making these changes we need to notify systemd via `systemctl daemon-reload`
- Verify that systemd recognizes our “Drop-in” via `systemctl status httpd`
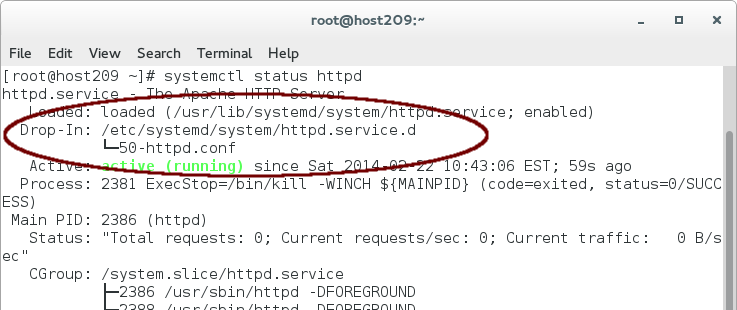
- The changes will also be reflected in `systemctl show httpd` but we can easily filter these via: `systemctl show -p Restart httpd` or `systemctl show -p StartLimitAction httpd`
- Open a second terminal and run `watch -n 1 systemctl status httpd`, note the uptime under “Active”, then from your original terminal run `sudo pkill httpd`. …..pretty neat huh?
- Remember we also set StartLimitAction=reboot; this will prevent service restart loops. Use the up arrow to quickly run `sudo pkill httpd` 7 times. What happened?
- This is an option that should be used with caution. If you need to configure this you should probably adjust StartLimitInterval & StartLimitBurst for your environment as well. For more details see: http://0pointer.de/blog/projects/watchdog.html
- Now we need to do something similar for mariadb.
- First quickly examine the unit file with `systemctl cat mariadb`
- Now run `systemctl edit mariadb`
- In the editor add:
[Service]
Restart=always
- Save and exit the editor.
- Verify that systemd recognizes the settings with `systemctl show -p Restart mariadb`
- Start mariadb if it’s not already running and test the policy using `sudo pkill mysqld`
Lab 3: Leveraging cgroups with systemd
systemd will setup a single root cgroup hierarchy under /sys/fs/cgroup/systemd. This is used to keep track of services and their child processes. We’ll need to understand the following unit types.
- Slice - A unit used to build the cgroup hierarchy. This is essentially how the system is “carved up.”
- Scope - A transient, organizational unit that groups processes that have registered with systemd. User sessions, VMs, and containers are exposed as scopes for resource management.
- Service - A daemon or group of processes that systemd controls and monitors.
By default, the system will have three slices: system, user, and machine. System.slice is the default location for service units. The services that ship will RHEL, e.g. httpd and mariadb, will be located in this slice by default. User.slice contains all user sessions and processes. The machine.slice contains VMs and containers, and isn’t created until one or more of these are started. Each of these slices are directly under the root slice and get equal scheduler time while the system is under contention. The default configuration prevents processes from any slice from monopolizing the entire system. It also goes a step further and prevents the same thing within each slice and scope. Previously scheduling time was done per thread, and services with a disproportional amount of processes received a disproportionate amount of CPU time.
By default slices, scopes, and services default to CPUShares=1024. This will work perfectly for most workloads out of the box.
For more information see: http://www.freedesktop.org/wiki/Software/systemd/ControlGroupInterface/
Scenario: Become familiar with systemd’s tools for viewing and allocating resources at a service.
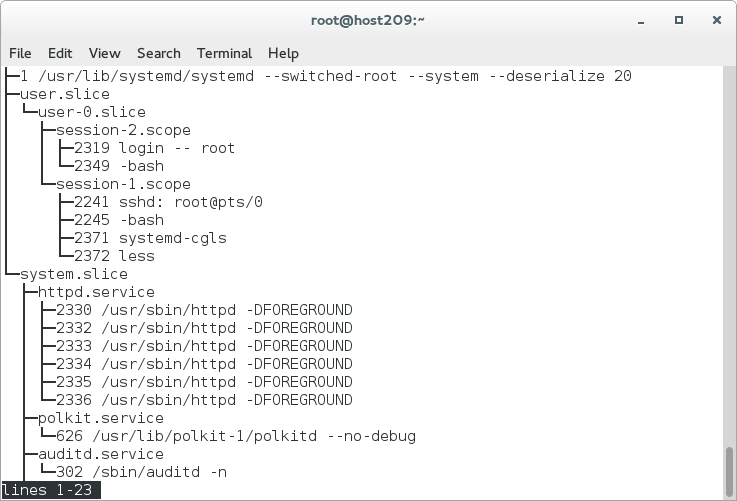
- Run systemd-cgls to view the default hierarchy on our VM.
- Open a second terminal and run systemd-cgtop. Leave this running for the remainder of this section of the lab. This is always a good idea and will help prevent SFTHD, aka shooting from the hip disorder.
- Let’s put some load on apache, and monitor it. From the original terminal run `systemctl start ab-bench`
- Did the output of systemd-cgtop look as expected?
- Stop ab w/ `systemctl stop ab-bench` or `pkill ab`
- We need to enable accounting for the cgroup controllers that we want to tune or monitor. The available high-level controllers, as of recent versions of systemd, are CPUAccounting, MemoryAccounting, TaskAccounting and BlockIOAccounting. Let’s enable three for httpd.
- `systemctl edit httpd` and add the following:
[Service]
CPUAccounting=1
MemoryAccounting=1
BlockIOAccounting=1
- Write the file and quit the editor. Which of course equates to `:wq`, since humans always prefer the vim editor.
- Adjusting cgroups can be done on the fly, but when accounting is initially enabled, per service or in some cases per slice, services must be restarted to take advantage. Keep an eye on the other terminal and run `systemctl restart httpd`
- Now let’s run our benchmark again on the system. Run `systemctl start ab-bench` and monitor the output of the other terminal.
- Notice that system.slice & user.slice are both using roughly the same amount of CPU. Why is that? Hint look at the output of `systemd-cgls` and `top`.
- Note: The number of CPUs on the system will vary the percentage CPU split between the user & system slice. Why?
- Play around with enabling/disabling CPUs: echo [0|1] >
- Since both the system and user slice are at the same point in the same place in the hierarchy and default to CPUShares=1024, apache won’t starve the benchmark.
- Stop the apache benchmark by running `systemctl stop ab-bench` or `pkill ab`
- Let’s enable the same controllers for mariadb.
- Run `systemctl edit mariadb` and add the following:
CPUAccounting=1
MemoryAccounting=1
BlockIOAccounting=1
- Now we’re going to put the whole system under load. Run `systemctl start mariadb-bench ab-bench userjob1`
- This runs all our units from the earlier lab.
- Monitor the systemd-cgtop terminal. You might want to also open a third terminal and leave `top` running.
- With the system under load and cgroup accounting enabled, we can now start tweaking the cgroups.
- Let’s lower the CPU shares for user.slice to allow the system slice, and hence mariadb and httpd, more CPU time. Then do the opposite.
- Run `systemctl set-property --runtime user.slice CPUShares=30`
- Run `systemctl set-property --runtime user.slice CPUShares=3000`
- After watching the difference reset the CPUShares to 1024.
- Right now httpd & mariadb have equal CPU time under the system slice. Let’s give httpd more.
- `systemctl set-property --runtime httpd CPUShares=3000`
- Notice that the user & system slices aren’t altered by this, but httpd and mariadb are.
- When you’re ready to move to the next step run `systemctl stop mariadb-bench ab-bench userjob1`
***TIP*** In step 8 we’re making drastic changes to show how this works. It’s recommended to make smaller, incremental changes when doing this in real life. Instead of jumping all the way to 3000, start with something closer to 1200 and monitor the environment. If you need more CPU time on the scheduler, move to 1400, etc. Also note that cgroup accounting is expensive and should be disabled after the tuning is complete.
- Let’s promote httpd to it’s own slice. This is useful if you have an application or service that you want to guarantee gets significantly more scheduler time than other user or system processes/services.
- Modify httpd unit and add
Slice=apache.slice #<---remember the ‘S’ in Slice is case sensitive.
- Restart httpd
- Run `systemctl start mariadb-bench ab-bench userjob1`
- Run `systemctl set-property --runtime httpd CPUShares=3000`
- Did that do what you expected it would?
- Run `systemctl set-property --runtime apache.slice CPUShares=3000`
- Run `systemctl status httpd` and notice the loaded drop-ins and new cgroup.
- Once the settings are configured appropriately for your use case and workload, drop the --runtime option to persist the settings.
- Run `systemctl set-property httpd CPUShares=3000 MemoryLimit=100M`
- Run `ls /etc/systemd/system/httpd.service.d/` and investigate the files that were created. Is this what you expected to see?
Lab 4: The Journal
Logging in the 21st Century
systemd includes a powerful logging component called the Journal. The systemd-journald service captures all logging messages with metadata, indexes them, and exposes them to the user via a utility called journalctl. In Red Hat Enterprise Linux 7 the journal is not persistent by default and forwards all messages to rsyslog. Rsyslog is the default logging daemon because of the rich enterprise features it provides. That said, the journal provides an amazing toolset and can be leveraged in parallel or in place of rsyslog.
Scenario: Become familiar w/ the journal and learn how to filter it.
- Run `journalctl` and page through using the spacebar. Notice that any warning messages (technically notice & warnings, priorities 4 & 5) are bold and errors are red. The formatted text will instantly draw your eyes to messages at these priorities.
- Quick review of priorities: Emergency: 0, Alert: 1, Critical: 2, Error: 3, Warning: 4, Notice: 5, Informational: 6, Debug: 7
- Filter the journal by priority, starting at 7 and working to 0.
- `journalctl -p 7
- `journalctl -p 6 …..etc
- Experiment with the following filters on the journal. Run journalctl followed each of the following options (or a mixture of options):
-r | Reverse the journal; newest entries first |
-e | Show last 1000 lines |
-b | View messages since last boot (-b -1 previous boot) |
-u | Filter by a unit file, e.g journalctl -u httpd.service |
-k | show kernel messages, basically dmesg |
--since=DATE | YYYY-MM-DD 00:00:00 |
--until=DATE | YYYY-MM-DD 00:00:00 |
*Notice that by default the output is formatted or “paged” with less. Don’t forget that you can use the right and left arrows to scroll horizontally on smaller terminals. This can be disabled by passing the --no-pager option.
- Non-root users will need to be in the systemd-journal group to access to the system’s journal.
- Run `id` and see if your user account is in the systemd-journal group
- If not, run `usermod -a -G systemd-journal $USER`
- On some distributions the journal writes to a ring buffer in memory. To enable persistence simply run: `mkdir /var/log/journal` and restart the systemd-journald.
- The journal stores metadata around each entry. Let’s take a look at what’s stored and indexed. Run `journalctl -n 1 -o verbose`
- Notice the key=value format
- Next let’s use shell completion to help us filter the journal.
- Type `journalctl [tab] [tab]` notice that _EXE is one of the fields.
- Add _EXE [tab] [tab] so the command line looks like $ journalctl _EXE=/usr/
- Pick a binary or two listed and view the output.
- Something like `journalctl _EXE=/usr/lib/systemd/systemd` or `journalctl _EXE=/usr/bin/bash`
- Step 6 helped us quickly identify what’s currently in the journal. If there’s a binary you want to filter by simply append it. Just like with systemctl we can “glob” files and the output will be interleaved. This is incredibly useful for seeing how services, applications, users, etc interact with each other.
- journalctl /usr/lib/systemd/systemd /usr/lib/systemd/systemd-journald
- journalctl /usr/sbin/NetworkManager /usr/sbin/dhclient
- We can put these filters together to quickly view specific & relevant logs quickly.
- journalctl -u mariadb --since=09:00 --until=11:30
- journalctl -u mariadb -u httpd --since=09:00 --until=11:30
Sealing the journal.
Forward Secure Sealing (FSS) is used to ensure the integrity of the journal. “Sealing” keys are automatically regenerated (15 min by default) and used to cryptographically seal the logs. A separate verification key is used to validate the contents. This prohibits an attacker from altering the log’s history on a system. For details on FSS please see: https://eprint.iacr.org/2013/397.pdf
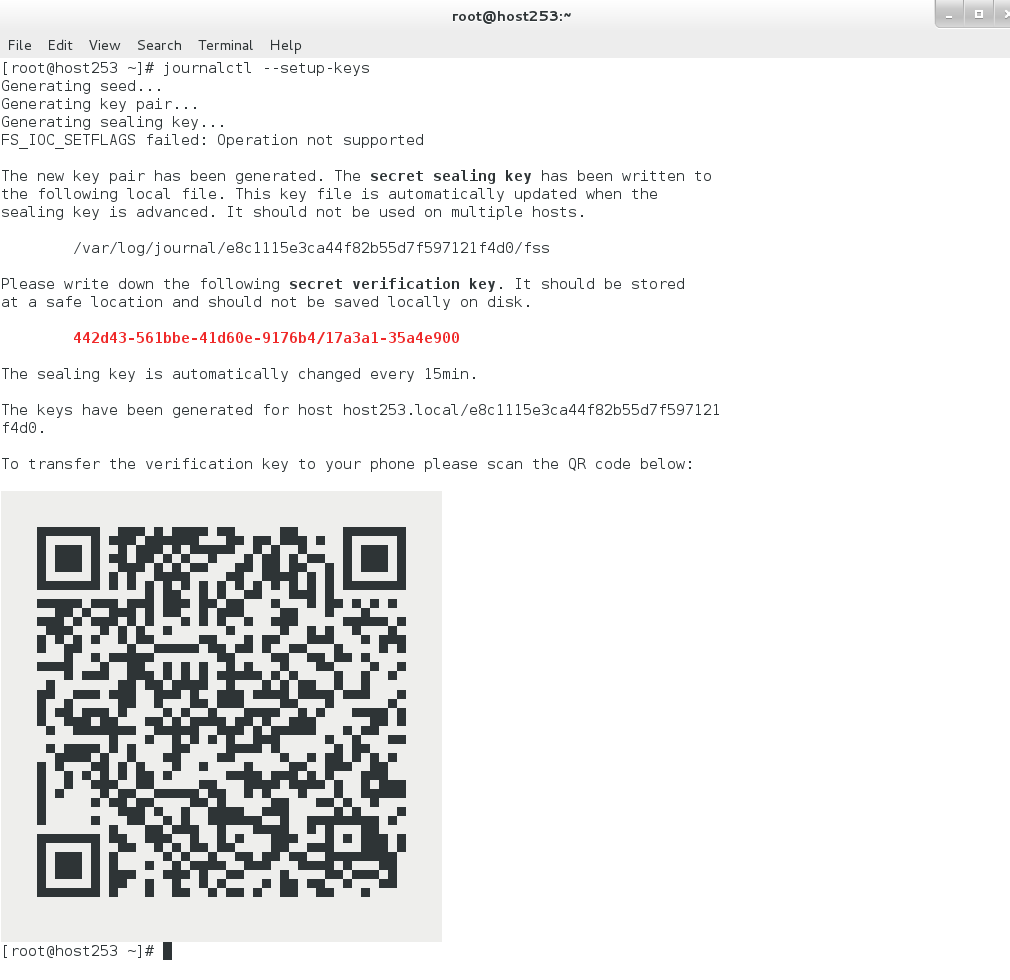
- Run `journalctl --setup-keys` As the name implies, this command will create the key pair used to seal the journal. It is important not to store the validation key on the local system. The QR code makes it simple to transfer.
- We can now verify the journal’s integrity using journalctl --verify-key=[secret-verification-key]
For more information on using the journal please visit: http://0pointer.de/blog/projects/journalctl.html
Lab 5: (optional) Self-paced Learning
With the remainder of time, pick a component of systemd that you’re least familiar with and do some self-study. This could be anything from reading man pages, blog posts, or experimenting with a live system. Anything goes!
References:
Systemd project page:
http://www.freedesktop.org/wiki/Software/systemd
Lennart Poettering's systemd blog entries (read them all)
http://0pointer.de/blog/projects/systemd-for-admins-1.html
Systemd FAQ
http://www.freedesktop.org/wiki/Software/systemd/FrequentlyAskedQuestions/
Tips & Tricks
http://www.freedesktop.org/wiki/Software/systemd/TipsAndTricks/
Appendix
Libvirt create VM script: (please tweak for your environment)
IMAGE=./Fedora-Cloud-Base-24-1.2.x86_64.qcow2
#create meta-data
{ echo instance-id: node0; echo local-hostname: node0.example.com; } > meta-data
#create simple user-data w/ passwords fedora
printf '#cloud-config\nusers: \n - default\n - name: cloud-user\n sudo: ["ALL=(ALL) NOPASSWD:ALL"]\n groups: wheel,adm,systemd-journal\n ssh_pwauth: True\nchpasswd:\n list: |\n root:fedora\n cloud-user:fedora\n expire: False\n' > user-data
#create iso
genisoimage -output cloudinit.iso -volid cidata -joliet -rock user-data meta-data
#create snapshot
sudo qemu-img create -f qcow2 -b $IMAGE $IMAGE.snap.qcow2
#create VM
sudo virt-install -v \
--name f24-systemd \
--os-variant fedora23 \
--ram 2048 \
--vcpus 2 \
--disk bus=virtio,path=$IMAGE.snap.qcow2 \
--disk device=cdrom,path=cloudinit.iso \
-w network=default,model=virtio \
--noautoconsole \
--boot hd